Soooo it's obviously been a while since my last post, so I figure this time I should post something worthwhile. In this case, it was a creation I came up with last week. This stuff is delicious on pretty much anything, but I really like it on the new Mission Multigrain chips that just hit shelves this season.
In any case, you'll be making double batches in no time.
Ingredients:
1 ear of corn, boiled (or canned niblets if you're in a bind)
1 can black beans
1/2 sweet white onion
1 avocado
1 can fire-roasted tomatoes
1/4 cup white rice vinegar
fresh cilantro
chili powder
black ground pepper
It's pretty basic: cut the corn off the cob (or if using niblets, pan fry with pepper), strain the beans and the fire roasted tomatoes, and chop up the avocado, onion, and cilantro. Then put it in a bowl with the vinegar and chili powder, stir it all up, and-- ta da-- yummy salsa-guac.
Then dig in! That's the best part.
Happy summer days to you all!
Laura
Tuesday, May 29, 2012
Monday, April 9, 2012
DIY Bleached Tees
Warm air means that it's time for outdoor projects... finally!
I originally found this idea on A Beautiful Mess and thought to give it a try; now I'm hooked and have more projects planned with bleach painting. This is an easy one that requires not much more than you'd probably find at home, or would spend $10 on at the store.
Bleached Tees
Materials:
*Note: This project is obviously best for the outdoors because of the use of concentrated bleach. However, if you're stuck with a rainy day, just make sure you have plenty of windows open!
1. Take your tee and place a layer of cardboard inside so the bleach doesn't bleed through to the back.
2. Use a small paintbrush to make very light strokes-- too heavy with the bleach and it'll run and look bloppy. You'll be able to see results almost instantly!
3. Once your design looks how you like, just let it sit outside to dry for a bit. Then, wash and wear!
Enjoy the sunshine! Cheers!
I originally found this idea on A Beautiful Mess and thought to give it a try; now I'm hooked and have more projects planned with bleach painting. This is an easy one that requires not much more than you'd probably find at home, or would spend $10 on at the store.
Bleached Tees
Materials:
- t-shirt(s)
- bleach
- paint brush
- cardboard
*Note: This project is obviously best for the outdoors because of the use of concentrated bleach. However, if you're stuck with a rainy day, just make sure you have plenty of windows open!
1. Take your tee and place a layer of cardboard inside so the bleach doesn't bleed through to the back.
2. Use a small paintbrush to make very light strokes-- too heavy with the bleach and it'll run and look bloppy. You'll be able to see results almost instantly!
3. Once your design looks how you like, just let it sit outside to dry for a bit. Then, wash and wear!
Enjoy the sunshine! Cheers!
Monday, March 26, 2012
Relaxing Lavender Heat Pads
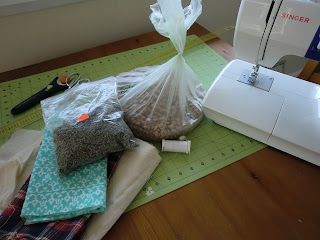
Materials:
-1/4 yard of flannel or cotton for outer case (I like cozy flannel prints!)
-At least 7 inches in width of thin cotton like muslin for inner heat pad
-Thread
-Sewing machine or hand sewing abilities
-Cutting tools
-Pinto beans
-Bulk lavender
Step One: Mix beans and lavender
-I mix about one cup beans and one tablespoon of lavender per "pouch."
-I sew about four pouches for each heating pad.
Step Two: Inner heating pad
-Sew muslin together to make a tube, keeping
one end open to fill with beans.
-After edges are sewn together, turn inside out
so seams are on the inside. After sewing, mine
was about 5" x 17" and one 5" end was left open.
-Pour one cup of bean/lavender mixture
into muslin tube, so it collects at the bottom.
-Now you're going to sew these beans in,
making a pouch about 5" in length.
The hardest part is keeping the beans
from wandering into your seam line (see pic).
-Continue with this pattern, pouring in beans and sewing up until you have four pouches.
-To sew up the end, fold in the raw edges and sew it closed.
-That is your inner heating pouch!
Step Three: Outer casing
-Take your 1/4 yard of outer material, hopefully the length will be similar to the muslin if you
buy it by the yard. It should be a couple inches longer since the muslin has been sewed up.
-First you want to sew the upper edges of the side that will remain open, so the inner pouch can slide in and out (just like a pillow case!).
-Make sure you sew up these edges first. I just roll the edge over a couple times, so no raw is showing. Ironing it flat makes sewing easier if you choose.
-Next sew your pieces together, wrong side out, leaving the top edge open.
Once edges are sew together, turn right side out and insert inner pouch. Your heating pad is completed!
Mmmm toasty
Cozy plaid!
Depending on microwave strength, I put it in for about 45 - 60 seconds. It stirs up the lavender smell and is wonderfully comfortable on a cold night or getting over a headache.
Or try freezing it on a hot day!
xox
Saturday, March 10, 2012
Green Juice
A recipe for all the juicers out there:
One cucumber
+
Two green apples
+
Two kiwis
=
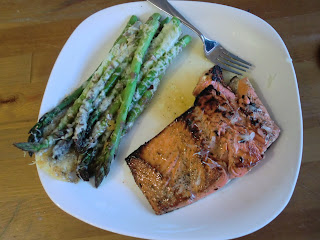
It paired very nicely with my first attempt at salmon!
Saturday, February 25, 2012
Secret Weapon: Chia Seeds
I first learned about chia seeds from a friend while I was working in South Korea and have been hooked on them ever since! Although many of you are probably thinking about this, you would be happy to know that these little omega-3 energy pods can prevent high blood pressure as well as blood sugar spikes. In fact, according to The Chia Seed, these little guys have more antioxidants than fresh blueberries. Pretty rad, right?
As a vegetarian, I'm always looking for creative ways to get all of my nutrients. This find really hit the target on a lot of the important marks, and can be a really simple addition to any meal (even sprinkled on salads) that gives your body some extra energy and love.
Although I have several recipes with chia seeds that I absolutely adore, this breakfast dip is one that I make almost daily. It's filling, easy to make, and-- most importantly-- it tastes great. Plus, it gives you tons of energy from raw, whole foods. Yum!
Morning Oatmeal Chia Dip (with apple)
Ingredients
1. Pour your oats, yogurt, and chia seeds into a cereal bowl.
2. Mix it up!
3. Slice up an apple and start dipping. Easy as that!
Happy mornings to you!
PS: If you like chia seeds and kombucha, make sure to try Synergy's Chia Kombucha drinks! Talk about an energy boost!
As a vegetarian, I'm always looking for creative ways to get all of my nutrients. This find really hit the target on a lot of the important marks, and can be a really simple addition to any meal (even sprinkled on salads) that gives your body some extra energy and love.
Although I have several recipes with chia seeds that I absolutely adore, this breakfast dip is one that I make almost daily. It's filling, easy to make, and-- most importantly-- it tastes great. Plus, it gives you tons of energy from raw, whole foods. Yum!
Morning Oatmeal Chia Dip (with apple)
Ingredients
- 1 cup uncooked oats
- 4 oz Greek yogurt (I use Greek Gods Honey Yogurt)
- 1 heaping tablespoon Chia seeds
- 1 apple (Honeycrisp are my favorite; what's yours?)
1. Pour your oats, yogurt, and chia seeds into a cereal bowl.
2. Mix it up!
3. Slice up an apple and start dipping. Easy as that!
Happy mornings to you!
PS: If you like chia seeds and kombucha, make sure to try Synergy's Chia Kombucha drinks! Talk about an energy boost!
Monday, February 20, 2012
Chalkboard Paint
I finally bought some chalkboard paint and have had many fun ideas! Two easy ones were my bulk food jar labels and my charging station labels.
Materials:
Chalkboard paint
Chalk
Painters tape
Paintbrush
Almost any surface you can paint on!
------------------------------------
Step One:
-Tape off label area-
This is my charging station box, which is actually a ribbon box from the Container Store.
------------------------------------
Step Two:
-Paint two coats of chalkboard paint in taped off area (wait one hour between coats)-
-Let paint dry for 24 hours and slowly peel off tape-
My bulk food jars
------------------------------------
Step Three:
-To "condition" the chalkboard area, rub entire piece with chalk and wipe away-
------------------------------------
Step Three:
Label away!
Charging station
&
Bulk food jars
I love chalkboard paint.
Labels:
acrylic paint,
boxes,
chalk,
chalkboard,
DIY,
organization,
simple
Seeing Spots
I found these Elmer's Painters and had some dot fun! They are filled with real acrylic paint so it's easy to control every mark but it gives the impression of awesome random splatter in the exact shape and patterns you want.
Not a good quality picture but you get the idea!
--(Painting on regular canvas with a layer of Mod Podge)--
Labels:
acrylic paint,
Australia,
color,
DIY,
dots,
Mod Podge,
painters,
wall art,
wallhanging
Subscribe to:
Posts (Atom)